All DNA barcoding projects begin with a tissue sample from which all subsequent genetic ..... Genomic Standards Consortium at http://gensc.org . 4. Spreadsheet ...
Chapter 12 Field Information Management Systems for DNA Barcoding John Deck, Joyce Gross, Steven Stones-Havas, Neil Davies, Rebecca Shapley, and Christopher Meyer Abstract Information capture pertaining to the “what?”, “where?”, and “when?” of biodiversity data is critical to maintain data integrity, interoperability, and utility. Moreover, DNA barcoding and other biodiversity studies must adhere to agreed upon data standards in order to effectively contextualize the biota encountered. A field information management system (FIMS) is presented that locks down metadata associated with collecting events, specimens, and tissues. Emphasis is placed on ease of use and flexibility of operation. Standardized templates for data entry are validated through a flexible, project-oriented validation process that assures adherence to data standards and thus data quality. Furthermore, we provide export functionality to existing cloud-based solutions, including Google Fusion Tables and Flickr to allow sharing of these data elements across research collaboration teams and other potential data harvesters via API services. Key words: Field data, Metadata, FIMS, Templates, bioValidator, Google Fusion Tables
1. Introduction All DNA barcoding projects begin with a tissue sample from which all subsequent genetic processing takes place. In order to receive the keyword “Barcode” in a Genbank submission of DNA barcode records, certain metadata elements are required associated with the specimen from which the tissue was derived. The three essential elements are: (1) Voucher Specimen with Unique identification, (2) name of the species, and (3) country of origin (see Note 1). Additional recommended metadata are strongly suggested; these include (4) latitude and longitude, (5) date of collection, (6) name of collector, and (7) name of identifier (see Note 2). Many researchers in biodiversity science recognize that this is but a fraction of the data elements required to truly contextualize biodiversity in space and time. Other data elements associated with both the collecting
W. John Kress and David L. Erickson (eds.), DNA Barcodes: Methods and Protocols, Methods in Molecular Biology, vol. 858, DOI 10.1007/978-1-61779-591-6_12, © Springer Science+Business Media, LLC 2012
255
256
J. Deck et al.
event and the specimen itself are important to capture for long-term comparative analyses. Most of these metadata types are included in the Darwin Core Standard (see Note 3). Specimens and ultimately tissues for DNA barcoding or any other genetic investigations are sourced from one of two places: new collections in the field (e.g., expeditions) or from existing collections (e.g., museums). There are advantages and disadvantages for gathering genetic material from each source. Table 1 reviews these pros and cons and should be consulted as a general guide for formulating an effective strategy for DNA barcoding. Regardless of where the source material is derived, some data capture system is required to digitally lock down the associated metadata and specimen photos and to track the information through the DNA barcoding pipeline. In this chapter, we present a field information management system (FIMS) as a vital part of the barcoding information flow. This is where the location, time, habitat, collectors, and initial taxonomic identification are recorded.
Table 1 Evaluating the source of specimens Existing collections
Field collections
DNA quality
(−) Can be low
(+) Likely high
Permitting
(+) Presumably completed
(−) Significant effort may be required
Photo documentation
(−) Poor (color gone, desiccated, etc.)
(+) Better (in situ, colors, etc.)
Habitat/taxon coverage
(−) Opportunistic, rely on what is there
(+) Sample strategically, targeted
Diversity
(+) Rare species available
(−) Rare species hard
New curation costs
(+) Already committed
(−) Significant (~80%)
Field metadata quality
(−) Possibly poor (Country or County, etc.)
(+) Can be exact (microhabitat, GPS, etc.)
Taxonomic identification
(+) Likely high precision
(−) Burden to taxonomic community
Access and logistics
(+) Group aggregated in one place
(−) Multiple trips
Collection cost of specimen
(+) No collection cost
(−) Expeditions costs
Focus of study
(+) Systematics focus
(+) Geographic focus: monitoring, ecology
Taxonomic focus
(−) Traditional preservation precludes molecular work (e.g., formalin)
(+) Fresh material available
Temporal perspective
(+) Change over time
(−) Single time slice
12
Field Information Management Systems for DNA Barcoding
257
This information is necessary to verify each barcode sequence that is run and is essential for any further reporting or information gathering. What we present herein is based on our experience with the Moorea Biocode Project, and effort to genetically characterize all macrobiota on a tropical island in French Polynesia. We have generalized our approach in order to be useful for any other researchers intending to initiate DNA barcoding projects or field expeditions.
2. Field Information Management Workflow
2.1. Data Entry via Spreadsheets
The design of the FIMS is based on a compromise between the needs of information managers (database engineers) and the front-end users (collectors). The protocol presented here does not assume an internet connection in the field. As such it can be deployed and used in remote locations. After trying a variety of data ingestion methods, including Web forms, we ultimately settled on using Microsoft Excel spreadsheets as most researchers are familiar with the interface. Ease of use is the primary concern for getting buy-in and cooperation at the beginning of the data cascade in order to insure metadata capture. These spreadsheets are then validated using a distributed bioValidator client software tool in order to minimize data post-processing, reduce the burden on information managers, and provide direct feedback to the input users who are more familiar with the original metadata when there are problems. Finally, when an internet connection is available, data may be uploaded to Fusion Tables for exploration, mapping, sharing, recombining, and even exchange into other tools like LIMS. Your project will require adopting a project spreadsheet template or creating a new one. The Moorea Biocode project created a spreadsheet template for all researchers to use in the field, and which the validation tool “bioValidator” is able to interpret. Likewise, Barcode of Life Data Systems (BOLD) has created a different template with a subset of the Biocode fields, based on the requirements of the barcoding community for collecting specimenbased data. BOLD spreadsheet templates can be similarly validated using bioValidator in order to minimize user input error. Whatever your goals are for your project, it is important to spend time at the beginning to think about all of the information that you require. There is a balance between creating so many fields that the user becomes overwhelmed and also being explicit enough to capture the pertinent information. We maintain a simple concept behind the organization of the data in the Biocode spreadsheet templates that has been effective for project management and workflow. The template includes two sheets. In the first sheet, each line represents a collecting event and includes
258
J. Deck et al.
all metadata pertaining to where and when a particular specimen was collected (e.g., time, latitude and longitude, elevation, collectors, collection method). Because a single event can have multiple specimens (one to many relationship), we then have a second sheet in which each line represents a specimen from a particular collecting event and its relevant metadata (e.g., taxonomy, microhabitat, fixation, life stage). Each specimen must have a corresponding collecting event (one of the validation steps checked by bioValidator). Importantly, a third data object critical to the barcoding pipeline is the tissue sample. All DNA barcoding requires the collection of some genetic material for processing. Because many tissue samples can come from the same specimen, and because some genetic analyses may specifically target certain tissue subtypes (e.g., transcriptomics), we enforce unique tissue identifiers in the validation process. Tissues are entered into the specimen spreadsheet for matter of convenience, but upon validation and uploading to Fusion Tables each line is based on a unique tissue identifier. In this way, the Tissue_ID is the pivot point linking the field and specimen metadata to the molecular workflows, linking the FIMS to the Laboratory Information Management System (LIMS) (see Chapter 13)). The existing Biocode template can identify up to two unique tissue objects, a tissue sample in a plate/well format meant for destructive sampling and an archival tissue that has to have a unique identifier entered into the “tissue_barcode” field. 2.1.1. Download Spreadsheet Templates
Follow the links here to download either the Biocode spreadsheet template (http://biocode.berkeley.edu/excel/BiocodeTemplate.xls) or the BOLD spreadsheet template (http://www.boldsystems.org/ docs/SpecimenData.xls). New spreadsheet templates and mechanisms for validating that data can be accommodated by the authors on a case by case basis. Please contact JD for more information. Open the files using a spreadsheet utility (see Note 4).
2.1.2. Managing Spreadsheets
Spreadsheets are a familiar tool for researchers that allow quick and easy manipulation of data. However, certain practices need to be followed to allow for success. It is up to the user, for instance, to maintain backup copies of their spreadsheets, and to ensure that data are handled correctly while using the spreadsheet. A classic mistake that may be difficult to recover from is sorting only one column in an entire sheet of data. This is a type of error that even the most sophisticated validation tool may not be able to spot. Typically, it is better to keep spreadsheets to less than 1,000 rows. This will make the validation process go more smoothly, make it easier to spot and fix errors, and help with validation, photo-matching, loading, and processing. This requires some planning with how to store and manipulate your spreadsheets. Some teams organize their spreadsheets by tissue plates, while others may organize by taxonomic group, collecting event, collecting trip, or a particular collector.
12
Field Information Management Systems for DNA Barcoding
259
Not all fields are required before validating and uploading your spreadsheets. Certain core fields must be filled, but other information can be updated at a later stage (see Note 5). 2.2. Validation Using bioValidator
Once sufficient event, specimen, and tissue metadata have been entered into the spreadsheets, these data can be validated based on user-defined parameters. bioValidator is a tool that is designed to validate event, specimen, and tissue data while offline. Operating offline allows researchers to check their spreadsheet data while it is being entered in remote locations and to promote the use of unique identifiers and linking to photos and other metadata before it is uploaded to an online server. bioValidator thus provides the validation funnel that organizes field data and provides the linkage to other data that are generated in the molecular barcoding process (see Note 6). This section demonstrates how to use bioValidator effectively.
2.2.1. Download bioValidator
bioValidator can be downloaded at the following link (https:// sourceforge.net/projects/biovalidator/). Information about bio Validator can be found at: https://sourceforge.net/projects/ biovalidator/. bioValidator installs and runs in a single file. It is recommended, however, that you create its own directory when downloading it. If you have Java 1.5 or later installed on your computer, everything will run fine. Otherwise, you will need to download and install Java 1.5 (http://www.java.com/en/download/ manual.jsp).
2.2.2. Building a Configuration File to Process Validation Rules
Before bioValidator can be run, a project must agree on a set of rules that the data must abide by. Examples of rules can be: enforcing unique names for a particular column, requiring data for particular columns, or restricting data elements in a column. This section discusses the validation rules that are available and is not meant to be a guide for actually building a rules file (see Note 7). Recognizing that all projects are different, the rules file is configurable and can be used to support projects in any domain and different types of spreadsheet templates. Two error levels can be set for each rule: error or warning. If error level is set, then it means that this row cannot be loaded to an online database or photo-matching cannot be started. The rules file is written in XML and can call any of the following predefined methods (Table 2). Currently, the bioValidator configuration file must be done by hand as there is not a mechanism to generate it automatically. An automated validation file generator is planned soon. Meanwhile, the developers can be contacted with help on this for setting up new files (see http://biovalidator.sourceforge.net/).
2.2.3. Validating Spreadsheets
Once you have created or downloaded your spreadsheet template and filled in some data, you can run the validation. By default, the Biocode validation schema will be loaded but you can change this
260
J. Deck et al.
Table 2 Rule types implemented in bioValidator Rule type
Purpose
uniqueValue
Enforce unique values in a particular column.
checkLowestTaxonLevel
Ensures that the lowestTaxonLevel fields match known values
checkTissueColumns
Given a plateName and wellNumber attributes, check for consistency in naming, parseable names, and nonduplication
checkInXMLFields
Check value against a list of acceptable values.
RequiredColumns
These columns must exist in the spreadsheet and also not have empty data
DwCLatLngChecker
Check for acceptable latitude, longitude, error radius, and datum values
BoundingBox
Check that the latitude, longitude is within a specified bounding box
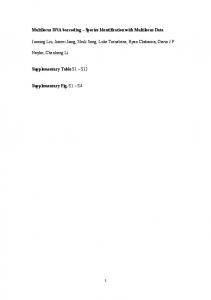
to point to any of the other available validation schemas by selecting the “Load Validation” button. After selecting a new schema, bioValidator will continue to use that schema every time you start the application. The next step is to load your spreadsheet. Click the “Load Spreadsheet” button and select your spreadsheet from your file system. When the spreadsheet is loaded you can click the “Run” button to run the validation (Fig. 1). You will be able to see the progress of the validator as it processes each rule. When it is done running, you will see either a green “valid” message, orange “warning” message, or red “error” message depending on the errors in your spreadsheet. By clicking on the Specimen or Collecting Event Results buttons you can see the context of the messages and fix the issues in your spreadsheet. When the issues have been addressed in your spreadsheet, click the “Run” button again and repeat the process until everything is “valid” or you can live with the “warning” messages. At this point, you are ready to continue entering data, load your data to Google Fusion Tables, or match photos. 2.3. Data Exchange Using Fusion Tables
Here, we take advantage of Google Fusion Tables. Fusion Tables is a public tool created by Google developers that allows researchers to visualize and publish their data online. Data from multiple researchers can be combined into one table. The Google Fusion Tables API enables programmatic access to the Fusion Tables content. We envision the use of Fusion Tables similar to a project
12
Field Information Management Systems for DNA Barcoding
261
Fig. 1. Main Page of bioValidator program.
oriented TAPIR/DIGIR service provider that allows collaborating researchers to share their data in a standardized format, maintain updated information, and allow remote access via the API to other tools like Laboratory Information Systems that can link workflows through unique identifiers to annotate subsequent processes. 2.3.1. Uploading Process
After you have validated your spreadsheet, you can upload to a Google Fusion Table. Press the “Upload to Fusion Table” button and enter your Google Account information (a Google Account can be created for free online with any email address). The loading process may take several minutes or longer if you are on a slow connection. When you are finished, you should see a message like the following: Uploading to Fusion Tables … be patient, this can take awhile … Create table Specimens_fishlarvae Inserting 188 rows into Specimens_fishlarvae (be patient) Create table Collecting_ Events_fishlarvae Inserting 11 rows into Collecting_Events_ fishlarvae (be patient) Specimens fusion table data is named Specimens_fishlarvae and is visible at: http://www.google.com/ fusiontables/DataSource?dsrcid=723314.
262
J. Deck et al.
Note that each time you load a spreadsheet you can choose the name of the existing spreadsheet to replace or to create a new one. You can also enter the name of the table ID to replace if you have that. 2.3.2. Fusion Tables Functionality
Google Fusion Tables has many functions aside from storing data online. While we discuss a few features in this section that are of particular interest in working with barcode data, it is best to also look at the Fusion Tables Web site for a comprehensive list of current features and capabilities (http://www.google.com/ fusiontables). When collecting event data are loaded, latitude and longitude fields can be used to automatically generate a map showing the point locations of the data. A map offers another visual validation tool, as well as helps tell the story of collecting events to others. It is also possible to select different styles for the points on the map, or export to Google Earth. It is possible to construct views of tables or to make a union of multiple tables into one larger table. This is useful for projects that may want to make a comprehensive view of all data that has been collected, or perhaps, to display only a subset of data that has been loaded. For example, suppose you load a spreadsheet with 100 different columns and you wish to view or share only three or four columns worth of data. Using Views, you can make a special table that just shows those columns. Finally, with Fusion Tables, we have a user-authenticated online storage system that we can easily use to share data between systems. This allows anyone in the world to adopt FIMS and LIMS systems and work with data seamlessly between the two systems. See Chapter 13 for information on how to connect your field data to the LIMS system.
2.3.3. Updating Data
While Fusion Tables is useful for loading, extracting, combining, and visualizing data, it does not have a robust user interface for editing data. Thus, we recommend that you make changes in your original spreadsheet and then use bioValidator to reload that data into Fusion Tables. When loading data into Fusion Tables, you can either choose to replace an online table by selecting from a drop down list of all tables associated with your user account, or by entering the table ID. In either case, the data for the items in the particular spreadsheet will be replaced in the fusion table (see Note 8). These data will be synchronized with the LIMS system as discussed in Chapter 13.
2.4. Managing Photos
Management of specimen photos in either the field or a museum requires some ability to attach this digital record to the specimen record. Complex workflows (multiple camera types, in situ
12
Field Information Management Systems for DNA Barcoding
263
photography, underwater images, etc.) often are difficult to manage in the field. We have created this photomanaging tool within bioValidator to link these images with the various specimens and provide a method to post them to a shared data source (Flickr) where they can be retrieved by multiple users using automated calls. 2.4.1. Naming Conventions
The photo naming system for photo loading consists of the collector’s specimen number, a “+” sign as a delimiter, and then any other information about the photo after the “+”. Photos without an exact match with the specimen number before “+” will not be loaded. Examples of photo names for a specimen with the identifier CM_1234 are: CM_1234+1.jpg and CM_1234+2.jpg; or CM_1234+a.jpg and CM_1234+b.jpg; or CM_1234+vellidae-0001. jpg and CM_1234+vellidae-0002.jpg; or just this, if you have only one photo for a specimen: CM_1234.jpg.
2.4.2. Photo-Matching in bioValidator
After you have loaded and validated a spreadsheet in bioValidator, you can then match a directory of photos to the specimens in your spreadsheet. If you have any errors on your spreadsheet, then you will not be allowed to match photos until those errors are fixed. The photo-matching process essentially renames images with the specimen_num_collector value (or other value as designated by your bioValidator configuration file). Images are renamed and copied to a specified output directory. Input image files are not changed or renamed in any way. Output image files are only renamed. Use the following procedures to match photos: ●
●
●
●
●
●
●
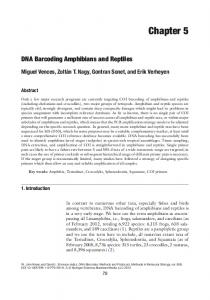
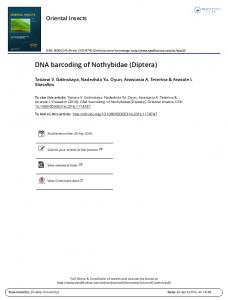
Click the “PhotoMatcher” tab on bioValidator. Select “Input Directory” to select a directory that contains images that you want to match. This will build a local cache of thumbnails and may take a minute or two to process while it is doing this. Select “Output Directory” to set the directory where the renamed photos will be copied to. Choose any additional fields to view in the specimen scroller by clicking on the green plus icon (Fig. 2). Navigate the input photos (on the left side of the screen) and the specimens (on the right side of the screen) until you are able to match a photo to a particular specimen. When you find a match, control-click on the image which copies the image over to the rename selection box. This is especially useful to quickly add multiple images to an individual specimen (Fig. 3). When you are done matching photos for a particular specimen, click “rename” to rename the images and copy them into the output directory.
264
J. Deck et al.
Fig. 2. Screenshot in PhotoMatcher Tool in bioValidator for selecting additional fields.
Fig. 3. Matching images to specimens in PhotoMatcher.
2.4.3. Photo Loading to Flickr
Photos can be bulk-loaded to Flickr using bioValidator or by directly loading into Flickr and assigning appropriate machine tags so photos can be harvested later. You must have a Flickr account to use this feature. It is free to create a Flickr account to load up to 200 photos. If you wish to load more photos than that, then you must subscribe to Flickr which costs $25/year.
12
Field Information Management Systems for DNA Barcoding
265
Following is the process to load photos to Flickr using bioValidator: ●
Click the PhotoLoader Tab.
●
Click on “Select Photo Directory” button.
●
●
Select the images you want to load to Flickr; selecting only one image will show the image and the specimen details that it is associated with. Once you have selected the images to load to Flickr, then you can click the “Upload to Flickr” button which will begin the upload process. The “FlickrStatus” should update to show each image as it is loaded to your Flickr account (Fig. 4).
Once your photos are in Flickr, they can be referred to online and searched using machine tags that are embedded in the site along with the image. The Moorea Biocode LIMS software (described in Chapter 13) integrates with the Flickr images uploaded by BioValidator. It may take up to 2 h for images that you have loaded into Flickr to be searchable via the LIMS system. Also, bioValidator sets the taxonomy:binomial construct to enable harvesting from other biodiversity providers, such as the Encyclopedia or Life (EOL) (see Note 9). Following are the machine tag designations set by bioValidator for the photo that you uploaded (Fig. 4):
Fig. 4. Screenshot in Flickr tool.
266
J. Deck et al. ●
bioValidator:specimen=MParis0979
●
bioValidator:file=MParis0979 + 02329.jpeg
●
bioValidator:date=2011-04-20_15:58:58
●
taxonomy:binomial=Blenniella gibbifrons
●
geo:lat=−17.613028
●
geo:lon=−149.821611
●
dwc:recordedby=Biocode User
3. Notes 1. Required DNA barcode data elements: While no specific Unique Identifier is noted, the DNA barcoding community recommends using the Darwin Core Triplet consisting of [Institutional Acronym:Collection Code:Catalog ID]. A listing of institutional acronyms can be found at http://www.biorepositories. org. For species names, provisional species are allowed (e.g., Galathea sp.8 Poupin). Finally, country of origin can include a body of water for marine taxa not within territorial waters (e.g., Pacific Ocean). 2. Recommended DNA barcode data elements: In addition to the four listed recommended elements, we highly recommend “basis of ID” as an additional field. In order to minimize the propagation of error, this field would allow tracking of consistent mistakes in identity (e.g., mislabeled field guides) and delineate those IDs based on morphologic features vs. the molecular sequence itself. 3. Darwin core standards: A listing of the Darwin Core Standards can be found online at http://rs.tdwg.org/dwc/index.htm. This is good place to start in defining fields for your project. Other metadata standards include those sanctioned by the Genomic Standards Consortium at http://gensc.org. 4. Spreadsheet templates: A description of the Moorea Biocode fields and spreadsheet template is available at http://biocode. berkeley.edu/batch_upload_help.html. Likewise, you can get started with the BOLD systems spreadsheet template by visiting http://www.boldsystems.org/docs/handbook.php? page=datasubprotocol. 5. Essential spreadsheet fields Biocode required fields: Collection Event ID, Entered By, TaxTeam, Country, Year Collected, Month Collected, Specimen Number, Phylum, Holding Institution. BOLD required fields: Sample ID, Field ID, Museum ID, Institution Storing, Country.
12
Field Information Management Systems for DNA Barcoding
267
6. FIMS as a stand alone tool: This proposed FIMS system can be adopted for any expeditionary work regardless of whether genetic postprocessing of the material will occur. Because we follow the data standards adopted by the museum community, simple ingestion scripts can be written to easily port the validated data to museum databases, such as KE EMu, Specify, or other adopted database systems. 7. Default validation schema: If your project adopts the Biocode spreadsheet template, then a prebuilt validation rules file that works with this template is installed automatically with bioValidator. 8. Updating data in fusion tables: Each time data are loaded to the Fusion Tables System, data are written to a new table instance in fusion tables. If you want to re-upload a spreadsheet, then you will need to note the Fusion Table ID in your LIMS system to update data there. 9. Flickr tags: Adding or changing the machine tag data in Flickr is possible but changes to the bioValidator:specimen field may render your image unsearchable to other systems.