HAN DBOOK'. MAHEfi-UEHS fl Share E Send I Cemrnerite . El T13. “MW ( The
September 0 List “. SHIN AND EDDY A fewthinge we think are just greet.
FOR. COLLABORATIVE. STUDIES. MESSAGE FROM THE PRINCIPAL. 4.
HISTORY, MISSION & PHILOSOPHY. 2. History. 2. Mission. 2. Philosophy. 2.
ET HANDBOOK NO. 406 _ . ETA 9002 DATA PREPARATION HAN DBOOK.
Eligible Persons eligible person is one who is. (a) the spouse of any person who
...
About the EPSON Status Viewer Service - TM-C100 . ..... Not all the functions
described here are available for all TM printers and printer drivers. See the. "
Printer ...
The Global Project Han dbook. A publication of the Talloires Network. The Heart
of Education for All: Literacy and the Talloires Network Global Campaign.
Preface. Admission Policies/Procedures. General Admission Policy. Class Size
and Waiting List Policies. Kindergarten Entrance Policy. Transfer Students.
The Australian. Immunisation. H dbook. Edition. National Health and Medical
Research Council. NHMRC. Page 2. TH. 60 in mid 1997. 55 in mid 1997. 22 in
mid ...
Az Epson L110 egyfunkciós nyomtató tintatartály rendszerrel működik, ... Az L110
nyomtató Micro Piezo nyomtatófej-technológiával rendelkezik és eredeti.
Apr 7, 2011 ... Australian Epson printer stockist, (excluding Australia Post, Big W, ... Epson
Stylus Office T1100 & a set of 4 Ink Cartridges: $110 Cashback*.
As part of our full line of dependable impact printers, Epson offers many ... DFX
models include 4 sets of 9 pins to provide a distinctive high-speed ... service
quality impact printers. Perhaps that is ... Cut sheet manual feed front in – front
o
Feb 23, 2014 ... EPSON FESTIVE ISLANDWIDE SALES BONANZA ... Epson L110 Epson L300
Epson L800 Epson L210 Epson L350 ..... Call 6586 3111 or visit www.cpson.ccm
.sg to find out more ... 24711724712 starrdards and osilmted 141 back ink
cartridge Once I
Of course, all new ink cartridges thereafter will have 100 percent capacity. E ... us work with Adobe RGB 1998 colour sp
Of course, all new ink cartridges thereafter will have 100 .... straight paper path and hence the very best rela- ... Co
MISSIO STATEME T. Aquinas Academy is a small private, co-educational day
school and home school support program that is operated by Catholic laymen ...
applications in the retail and service industries, and ... Epson's DFX printer uses
four sets of 9 pins for the fastest ... Cut sheet manual feed front in – front out ... 5 -.
LX-300+II FX-890. FX-2190. DFX-9000 LQ-590. LQ-680Pro LQ-2090. LQ-21
For a video tutorial and other information about setting up a wireless network, go
to: ... If your passphrase contains upper- or lowercase letters, be sure to note it ...
EPSON brings you the TM-L90, its revolutionary new label printer. Until now,
label ... But EPSON's new TM-L90 thermal label printer changes all that.
Designed ...
Installation instructions for the EPSON TMT T20 Printer with Corner Store. POS.
Corner Store POS supports Epson TMT T20 printers and cash drawers.
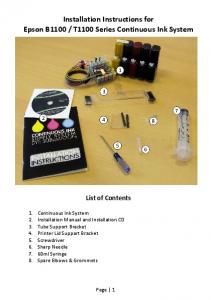
Epson B1100 / T1100 Series Continuous Ink System. List of Contents. 1.
Continuous Ink System. 2. Installation Manual and Installation CD. 3. Tube
Support ...
Low Cost of Ownership – The EB-X14 utilizes a low priced lamp and makes use
of a new High Efficiency Filter; extending the life of your projector. Epson EB- ...
Jun 28, 2012 ... CC59-A4-1. Full detailed report. (ISO/IEC 24734 Office Category Test). Printing
device and test setting. Test Start Date and Time. 2012/6/28 .
If your printer supports Epson Job Language (EJL) commands, do not change the printer mode using the ..... After a print
Place your bets for the ultimate space race! Our money's on Han and the Millennium Falcon ââ¬â after all, it's the s
16 bits per pixel per color internal. 8 bits per ... Photo data specifications. File format: ... Number of files: Up to
INSTALLATION HAN DBOOK Lamp and Status Information
Replacing the Lamp Before you replace the lamp, let the projector cool down for at least one hour so the lamp will not be hot. Warning: Let the lamp fully cool before replacing it to avoid injury. You can replace the lamp while the projector is mounted to the ceiling, if necessary. 1. Turn off the projector and unplug the power cord. 2. Allow the projector lamp to cool down for at least one hour. 3. Use the screwdriver included with the replacement lamp to loosen the screw securing the lamp cover.
Warning: If the lamp is broken, glass fragments may be loose inside the lamp chamber. Be careful removing any broken glass to avoid injury. 4. Slide the lamp cover out and lift it off.
INSTALLATION HAN DBOOK Lamp and Status Information
5. Loosen the screws securing the lamp to the projector. The screws do not come all the way out.
6. Lift up the lamp handle and gently pull the lamp out of the projector.
Note: The lamp(s) in this product contain mercury. Please consult your state and local regulations regarding disposal or recycling. Do not put in the trash.
INSTALLATION HAN DBOOK Lamp and Status Information
9. Replace the lamp cover and tighten the screw to secure it.
Note: Be sure the lamp cover is securely installed or the lamp will not come on. Reset the lamp timer to zero to keep track of the new lamp’s usage. Resetting the Lamp Timer You must reset the lamp timer after replacing the projector's lamp to clear the lamp replacement message and to keep track of lamp usage correctly. Note: Do not reset the lamp timer if you have not replaced the lamp to avoid inaccurate lamp usage information. 1. Turn on the projector. 2. Press the Menu button. 3. Select the Reset menu and press Enter.
4. Select Reset Lamp Hours and press Enter. You see a prompt asking if you want to reset the lamp hours. 5. Select Yes and press Enter. 6. Press Menu or Esc to exit the menus.