7 août 2007 ... dans la nouvelle version Microsoft Office Word 2007. ... PDF et XPS ... Microsoft
Word 2007 fonctionne sous Windows Vista, mais aussi sur.
80. 7.1. Part One - Preparation. 81. 7.2. Part Two â Retrieving Merge Data. 84. 7.3. Complete the Merge. 87. Download
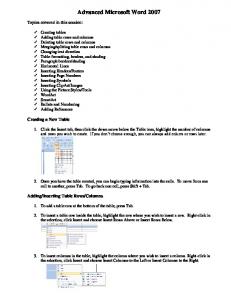
Advanced Microsoft Word 2007. Topics covered in this session: ✓ Creating tables
. ✓ Adding table rows and columns. ✓ Deleting table rows and columns.
Microsoft Office Publisher 2007 Tutorial “Microsoft Office Publisher 2007 is the business publishing program that helps you create, design, and
Microsoft PowerPoint is one of the most popular presentation programs
supported by both Mac and PC ... Microsoft PowerPoint can be used to create
interactive.
Jan 13, 2011 ... the information in previous versions of Microsoft Office in a more visual stream
line manner through a series of tabs that include an immense.
The double parentheses force the single paren- theses to print in the numerator. ((a+b)/(c+d) + n)/(f(x)+e^(1\/2)). The
Este Manual Básico ha sido preparado como un medio de ayuda y orientación
para aquellas personas que lo necesiten al utilizar la nueva versión de Word ...
Untuk Kelas : X ... SMK TAMTAMA 1 SIDAREJA. Page 2. Modul Praktikum KKPI
.... IX. Membuat Table. Untuk membuat table biasanya kita lebih mudah dengan ...
otomatis. bahkan perintah dan fungsi yang disediakan oleh software ini
menunjang ... Menu. Menu pada Ms Word 2007 ditunjukkan pada gambar berikut
.
Microsoft Word 2007 Keyboard Shortcuts TAB Move between options or areas in the dialog box. F4 or ALT+I Open the Look in list. F5 Update the file list.
Microsoft Word 2007 Get to know the Ribbon When you first open Word 2007, you may be surprised by its new look. Most of the changes are in the Ribbon, the
MODUL KKPI. Microsoft Word. 2007. Untuk Kelas : X. Semester 1. Design by :
ARIS BUDIANTO, SE. SMK TAMTAMA 1 SIDAREJA ...
Modul Panduan Microsoft Word. Bina Informasi Dan ... Setelah muncul tampilan
menunya pilih Program, kemudian Microsoft Office dan. Pilih. 3. Microsoft Office ...
EJERCICIOS. MICROSOFT WORD. 2007. 2011. 2012. José Juan Banegas
Salinas www.cyo.losnumeros1.es. 2011 2012 ...
Microsoft Word 2007. Course Contents: • Lesson 1: Get ... list of suggested tasks
and a set of test questions. .... Microsoft Word 2007. Recap/Practice. 1. Use the ...
4) En el menú que aparece se busca MICROSOFT WORD y se hace clic. ......
Combinar correspondencia es la forma de personalizar una carta o ... donde se
pone de manifiesto la relación formal existente entre las diversas unidades que
la.
Manual Prático Microsoft® Word 2007. 2 | Página ...... Um dos principais
objectivos deste Manual consiste em facilitar a migração dos utiliza- dores de
versões ...
This tutorial assumes a basic proficiency with Word and Excel. ... Since my data is
on the worksheet called “donors 2006” (see Page 2 of this tutorial), I select that ...
Therefore, I have already created a form letter in Microsoft. Word and entered my
data into a Microsoft Excel spreadsheet. Here is what my spreadsheet looks ...
PowerPoint 2. GETTING STARTED. Microsoft PowerPoint is one of the most
popular presentation programs supported by both Mac and PC platforms.
Microsoft ...
http://www.public.iastate.edu/~hschmidt/wordtutorial.html. Start the Program.
From the Start icon select Programs and Microsoft Word. The main screen for
Word ...
popular Office XP software programs. This Introductory Tutorial. teaches users the key features of ... Microsoft Word 20
Microsoft Word is an essential tool for the creation of documents. Its ease of use
... To run Word on your computer: “Start” >> “Programs” >> “Microsoft Office” >>.
To get started first familiarize yourself with the new set up of Microsoft Word 2007.
You will notice it does not have the regular menu system anymore. It now has ...
MICROSOFT WORD 2007 TUTORIAL To get started first familiarize yourself with the new set up of Microsoft Word 2007. You will notice it does not have the regular menu system anymore. It now has tabs and buttons. 1) Office button, 2) Quick Access Toolbar, 3) Tabs, and 4) Ribbon.
1
2
3
4
1. This is the Office button which is similar to the File menu in MW2003. This is also where you can customize your Quick Access Toolbar. A. Start new project, Open a Project, Save, Print, etc. B. This shows recent documents and is a quick way to open a recent project. C. This opens the Word Options window where You can change settings and customize your Quick Access Toolbar.
A
B
C
2. This is the Quick Access Toolbar. With this tool bar one can set it up to fit his/her needs. To do so just click the arrow at the end of this bar and select which items best suit your needs. They will be placed in the order they are selected. Again to customize this Quick Access Toolbar go to the office button and select Word Options. Click customize on the left and you can search for any buttons that suit your needs. A Shortcut to customize this bar is to right click in the Tabs bar and select Customize Quick Access Toolbar. 3. This is the Tabs Bar. Tabs are similar to the menu system of MW2003 instead of having dropdown menus MW2007 created the Tab and Ribbon system. When you select a tab it will display the Ribbon associated with that tab. Here everything has been changed into button form.
The picture above shows MW2007 and the bottom picture is MW2003. You can see the similarity of the two menu systems. MW2007 makes choices more readily available.
4. This is the Ribbon. The tabs display a Ribbon. In this Ribbon there are many buttons that are grouped into categories such as Clipboard, Font, and Paragraph. It will help if you take a couple minutes to look through all the tabs and Ribbons to learn the layout and to remember where to find buttons you will need when working on your projects and papers. Another new feature is the preview feature. If you scroll your mouse over one of the Styles in the Home tab it will show in your paper what it will look like before clicking the style.
Now the categories in each Ribbon may have a button at the end of its bar. If you click this button it will expand into a window and show more options. For example the Font category will expand into a window where it will have all the settings for the font and character spacing.
If you would rather have the Ribbon hidden then you can right click in the tabs bar and select Minimize the Ribbon. This will minimize the Ribbon until you click a Tab.
Last is the bottom of the screen where you will have the page, words, proofing, view, and zoom. If you click on the proofing button it will find the first error in document. It will only do one at a time. To correct the entire document select spelling and grammar from either the review Tab or from the Quick Access Toolbar. (F7)
The View buttons and Zoom controls are at the bottom right of the screen.
MAIL MERGE These are how-to links for mail merge from Microsoft. Mail merge I: Use mail merge for mass mailings http://office.microsoft.com/training/training.aspx?AssetID=RC102778121033
Mail merge II: Use the Ribbon and perform a complex mail merge http://office.microsoft.com/training/training.aspx?AssetID=RC102798041033
File Menu
Word 2003 Location
Word 2007 Location
Keyboard Shortcut
File > New
Office Button > New
Ctrl-N
File > Open
Office Button > Open
Ctrl-O
File > Close
Office Button > Close
Ctrl-W
File > Save
Office Button > Save or Quick Access toolbar > Save icon
Ctrl-S
File > Save As
Office Button > Save As
F12
File > Page Setup
Page Layout > Page Setup (click dialog box launcher for more options) or Office Button > Print > Print Preview > Page Setup (click dialog box launcher for more options)