The Johns Hopkins Institutions offer the “hopkins” wireless network to faculty, staff
... Your network card must also support Microsoft's Wireless Zero Configuration.
Wireless @ Johns Hopkins Wireless Configuration Guide:
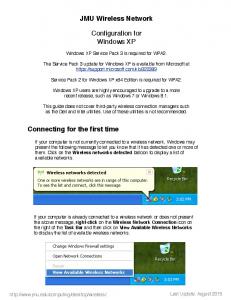
Windows XP Additional “hopkins” wireless network instructions and requirements for Windows 7, Vista, Mac OS X, and Linux can be found at: http://www.it.johnshopkins.edu/services/network/wireless/ The Johns Hopkins Institutions offer the “hopkins” wireless network to faculty, staff, students, or anyone with a valid JHED ID. The “hopkins” wireless network utilizes the 256-bit Advanced Encryption Standard (AES), and Microsoft's Internet Authentication Service (IAS) for authentication, to provide a higher level of security and access.
Requirements for Windows XP: 1. You will need an active JHED ID for authentication. If you don’t know your JHED userid and password, please follow the steps in the How do I find out my JHED account information section. 2. Windows XP with a minimum of Service Pack 2 must be installed. Please follow the steps in the Service Pack Verification section, to determine if you are running at least SP2. 3. A wireless network adapter that supports the 802.11b and/or 802.11g protocol(s) and WiFi Protected Access (WPA-Enterprise). 4. Your network card must also support Microsoft’s Wireless Zero Configuration (WZC) Service. Most new wireless network cards support WZC. However, if you are unsure if your network card supports WZC, check your vendor's online support or contact the vendor directly. 5. You must have the current drivers for your network card, which are usually available from the PC vendor's web site. 6. Symantec Antivirus must be installed. It is free for Hopkins affiliates, and can be downloaded at http://it.johnshopkins.edu/antivirus/. NOTE: Windows 9x, Windows Me, and Windows 2000 are not supported. If your computer has 802.11b and/or 802.11g support but doesn’t support WPAEnterprise, you can still attain wireless access through JHGuestnet. For more information, visit http://www.it.johnshopkins.edu/services/network/wireless/
If you meet all the above requirements, please proceed to the How to configure Windows XP for “Hopkins” wireless.
1
Wireless @ Johns Hopkins How do I find out my JHED account information? The following steps will allow you to activate your JHED ID. You will need access to a wired (ethernet) connection. Step 1: Open a web browser and go to http://my.johnshopkins.edu. Step 2: Click the First Time JHED User link. Step 3: Follow the instructions on the login page to find out your Login ID and to set your password. JHED account and Active Directory credentials should be the same except for some grandfathered accounts. If you have issues with signing in when asked for your User ID and password, please contact the Help Desk, (410) 955-HELP, to correct the issue.
Service Pack 2 Verification: Click the Start button, scroll up to Settings, and select Control Panel from the submenu. In the window that opens, double-click on the System control panel.
If you don’t see a minimum of “Service Pack 2”, you must install it to access the wireless network. http://www.microsoft.com/downloads/details.aspx?FamilyId=049C9DBE3B8E-4F30-8245-9E368D3CDB5A&displaylang=en
2
Wireless @ Johns Hopkins How to configure Windows XP for “hopkins” wireless: Step 1: From the Start Menu, click on Connect To and select Show all connections.
Step 2: Highlight the Wireless Network Connection, and right click. Select Properties at the bottom of the menu. NOTE: Your wireless card must be enabled to make changes.
3
Wireless @ Johns Hopkins Step 3: You should now see the wireless network properties. Select the Wireless Networks tab. If hopkins is already present in the list of preferred networks, select it and click Remove. Then click Add.
4
Wireless @ Johns Hopkins Step 4: In the SSID field, enter hopkins. The Network Authentication should be set to WPA. The Data Encryption should be set to AES.
5
Wireless @ Johns Hopkins Step 5: Click on Authentication Tab: For EAP Type, choose Protected EAP (PEAP) Uncheck “Authenticate as computer when computer information is available” Uncheck “Authenticate as guest when user or computer information is unavailable” Click on the Properties button for Protected EAP properties.
6
Wireless @ Johns Hopkins Step 6: In the “Protected EAP Properties” Window do the following: 1. Check the “Validate server certificate” box. 2. Check the “Equifax Secure Certificate Authority” box in the “Trusted Root Certification Authorities” list. If you do not see Equifax Secure Certificate Authority, you need to update your wireless card’s drivers to the latest version. 3. Check the “Enable Fast Reconnect” box. 4. For “Select Authentication Method,” choose Secured Password (EAPMSCHAP v2). Then click Configure.
7
Wireless @ Johns Hopkins Step 7: Uncheck the “Automatically use my Windows logon name and password (and domain if any)” box and click OK. Click OK in Protected EAP Properties box. Click OK in the Wireless Network Properties box. Click OK in the Wireless Network Connection Properties box. This will bring you back to the main desktop.
Step 8: Click on the message “Wireless Network Connection,” which you will see on the bottom right of your screen.
8
Wireless @ Johns Hopkins Step 9: Please enter your Credentials: For User name, enter your JHED ID. For Password, enter your JHED Password. For Logon domain, enter WIN.
You will then receive a message that the wireless network connection is now connected.
You are now on the network!
9
Wireless @ Johns Hopkins JHARS Registration Required for First-Time Users: Step 10: Open a new web browser window. If this is your FIRST time connecting this device to a wireless network at Johns Hopkins, you will be directed to our JHARS registration website. If you are not redirected, please type http://jhars.nts.jhu.edu. Click Log On to continue.
Step 11: You may be prompted by a certificate warning, depending on what version and type of web browser you are using. Please click Continue to this website.
10
Wireless @ Johns Hopkins Step 12: Enter your JHED logon credentials and click Login to access the registration process.
11
Wireless @ Johns Hopkins Step 13: Click on DYNAMIC IP to register.
12
Wireless @ Johns Hopkins
Step 14: Click Confirm to conclude and submit the request.
Step 15: Reboot to complete the registration process.
13
Wireless @ Johns Hopkins Where do I get additional help? Technical Assistance
Krieger Computer Lab
Garland Hall Basement Hours M-F 8AM-5PM
Krieger Hall Room 160 Hours Sunday 10AM-Friday 10PM, Saturday 10AM-10PM
Contact the Support Center at: (410)955-HELP (410)955-4357 (410)516-HELP (410)516-4357 (443)997-HELP (443)997-4357
Johns Hopkins East Baltimore Johns Hopkins Homewood Campus Johns Hopkins Mount Washington Campus
14